Hi!
We are really excited you’re here because we’re eager for you to start growing lots and lots of food!
With a GrowBot on its way, your home is about to be equipped with the most cutting-edge hydroponics technology available anywhere on the market. Rest assured that you’ve made a very good decision and you’re going to be very happy.

GrowBots are designed to be high-yield, eco-sustainable, easy-to-use, long-lasting and affordable.
We’ve said it before and we’ll keep reminding you, because it’s so important. Here at GrowBot we measure our success by:
- how much food you eat that was grown in your GrowBot…
- how much money you saved by feeding yourself with your GrowBot…
- how much time the GrowBot saves you…
That’s what we care most about.
That’s why it matters so much to us that you get your GrowBot up and running as soon as possible, once it arrives.
Like most things a little preparation makes most things go far smoother.
Contents of Setup Page
- Before Your GrowBot Arrives
- GrowBot Placement
- Getting The Right Water Hose
- Making Sure Your WiFi Reaches The GrowBot
- WiFi Extender
- Unpacking GrowBot After It Arrives
- Configuring The GrowBot’s WiFi
- Orienting The GrowBot
- Connecting The Water Hose
- Assemby
- Nutrients
- Planting
1. Before Your GrowBot Arrives
To have the most success growing food with a GrowBot, we want to make sure you are ready to start setting up and planting as soon as the GrowBot arrives.
There are two main issues that keep people from getting their GrowBots set up right away. Those two issues are the water hose and the WiFi.
Let’s resolve those two issues, right now, while your GrowBot is still in transit…
In order to complete the water hose and WiFi preparation for GrowBot, the first step is to determine where the GrowBot will be placed.
The next section below is called “GrowBot Placement” and the two sections that follow are called “Getting The Right Water Hose” and “Making Sure Your WiFi Reaches The GrowBot”. These three sections should all be completed before your GrowBot arrives.
2. GrowBot Placement
Have you figured out where you’re going to put your GrowBot?
This is something you should figure out before your GrowBot arrives. Let’s do it right now!
For the GrowBot to grow food it needs to live in a spot that has 6 or more hours of sunlight per day that isn’t shaded. This is very important, as plants need sunlight to grow.
The other important things GrowBot need are a heavy-duty water hose and WiFi.
The next two sections (entitled “Getting The Right Water Hose” and “Making Sure Your WiFi Reaches The GrowBot”) contain all the information you need to get the water hose and WiFi ready before your GrowBot arrives.
3. Getting The Right Water Hose
Your GrowBot needs its own water hose.
The hose for GrowBot needs to be a heavy-duty food-grade water hose like this one.
Heavy duty water hoses are designed to stay on for a long time, for years, without wearing down. The GrowBot water connection stays on at all times, so the GrowBot can add water whenever it needs. That’s why the GrowBot requires a heavy duty hose.
The hose for the GrowBot needs to be long enough to reach from where the GrowBot sits, all the way to your water faucet. The hose has to be long enough to be able to lay flat on the ground without tension. (Tension will cause leaks at both ends of the water hose, and we don’t want that!)
If you don’t currently have a heavy-duty water hose that is long enough to lay flat on the ground from your water faucet all the way to the GrowBot location, then you need to order one right now.
Before ordering the hose, make sure to measure the distance from your water faucet to the GrowBot location, to be sure the hose you get is long enough.
While you are ordering your garden hose, you will likely also want to order a “splitter” for your water faucet.
Buying a splitter will allow you to have a separate hose that you can use for purposes other than the GrowBot. The GrowBot needs its own garden hose that stays hooked up to the GrowBot at all times (this enables the GrowBot to water itself, so you don’t have to.)
We recommend getting a plastic splitter because the metal splitters corrode and usually end up breaking within 2 years. The plastic ones last much longer. You can choose a splitter that has one faucet that branches out to two faucets or you can buy a splitter that has one faucet that branches out into four faucets. (For setting up multiple GrowBots, be sure to purchase the bigger one.)
When you connect the GrowBot’s heavy-duty hose to the splitter, make sure the flip on that side is switched on. (A lot of times we get calls from people who think the GrowBot isn’t working, but when we troubleshoot the issue, we find out that the reason water wasn’t coming out is because they didn’t flip on the splitter switch.)
If you ever want to use your other hose, you can turn on the water on that side by flipping the other splitter switch.
You can keep the other side turned off if you’re not using it. But the flip on the GrowBot side always needs to stay switched on.
4. Making Sure Your WiFi Reaches The GrowBot
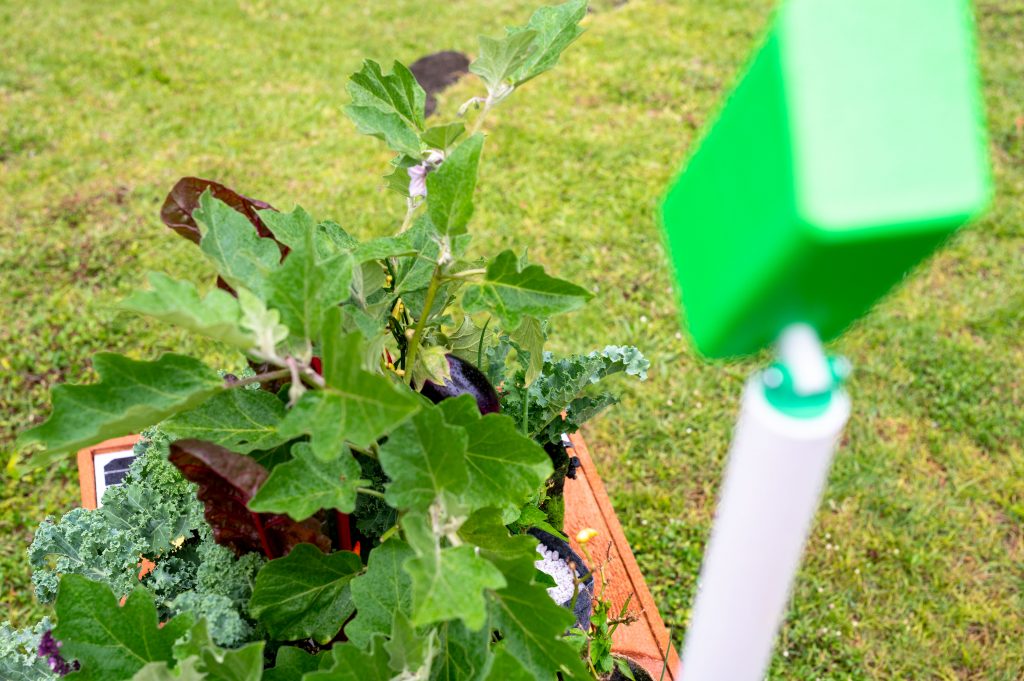
The GrowBot is automatic, and it uses computer vision and artificial intelligence to monitor and care for your plants.
For this to work, you need to connect the GrowBot to WiFi.
(WiFi is also used to make automatic software updates, optimizing your GrowBot’s performance.)
Lots of GrowBot owners find that their WiFi connections don’t reach the sunny location where the GrowBot will stay. The solution for this is to purchase a WiFi extension.
We recommend that you go immediately to the location where the GrowBot will live and turn off your cellular service and check to see if you can access our website mygrowbot.com using only your WiFi.
If you can’t, then right now go and order a WiFi extension.
Order your WiFi extender now and set it up before the GrowBot arrives if you can.
Below is the instructions for how to set up the WiFi extender.
5. WiFi Range Extender
If your WiFi already reaches the place where the GrowBot will live, then you can skip this sub-section.
But if you need to get signal to your GrowBot, Wifi range extenders are a quick and easy way to extend your home’s WiFi without having to do anything very technical.
Normally WiFi range extender setup is as simple as pushing a button on your router and pushing button on the extender (when the two are situated besides each other). And then from there the next step is to move the WiFi range extender to where it’s still within WiFi range – but closer to your GrowBot, to bring the GrowBot within the range of the WiFi extender’s coverage.
They are easy to configure in just minutes, and they work great.
When ordering one, search for “2.4ghz Wifi range extenders.”
6. UnPacking GrowBot After It Arrives
This is so exciting!
When you’ve reached this step it means your GrowBot has arrived.
GrowBots weigh approximately 40 lbs and are best moved by two average sized people.
Make sure to get some help unboxing it and moving it around. (And never drag the GrowBot, because that can break it.)
The GrowBot is designed to be very easy to use, and our goal is for everything to be easier than you expect. Once you get started, the set-up should only take approximately 30 minutes.
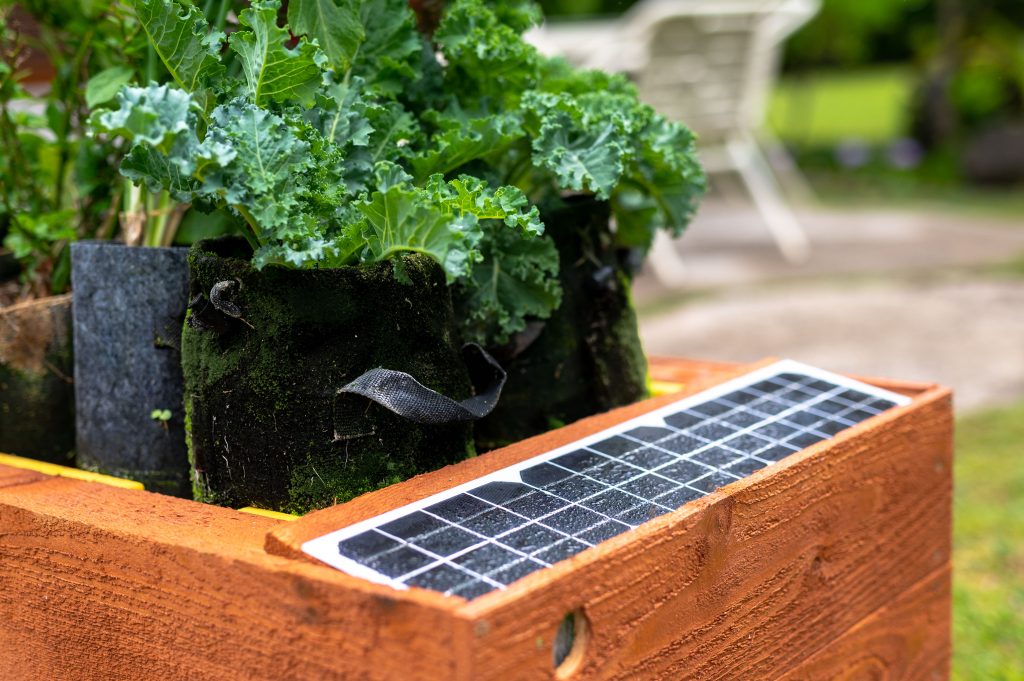
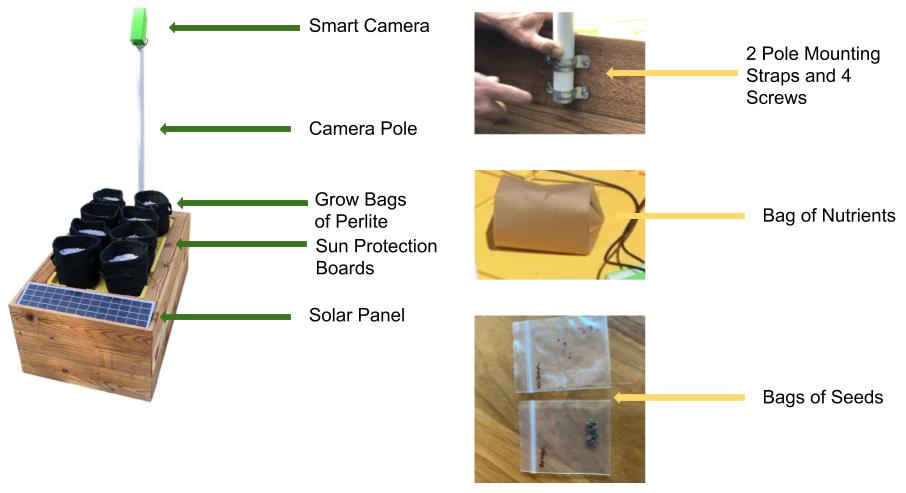
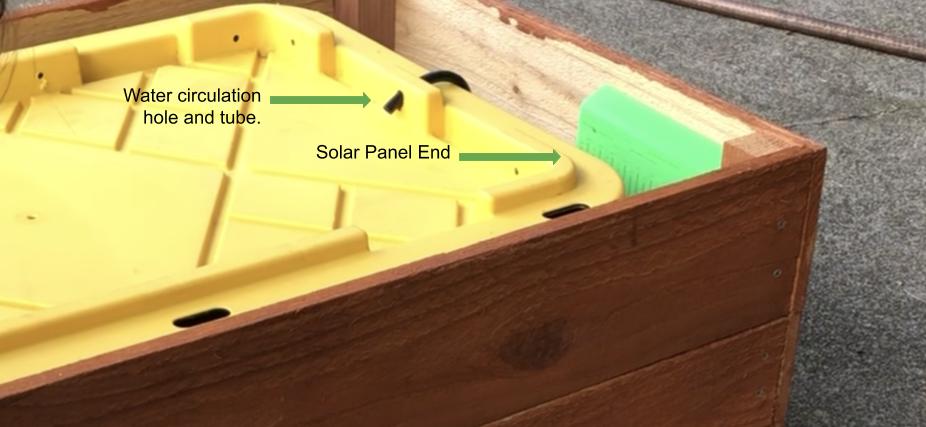
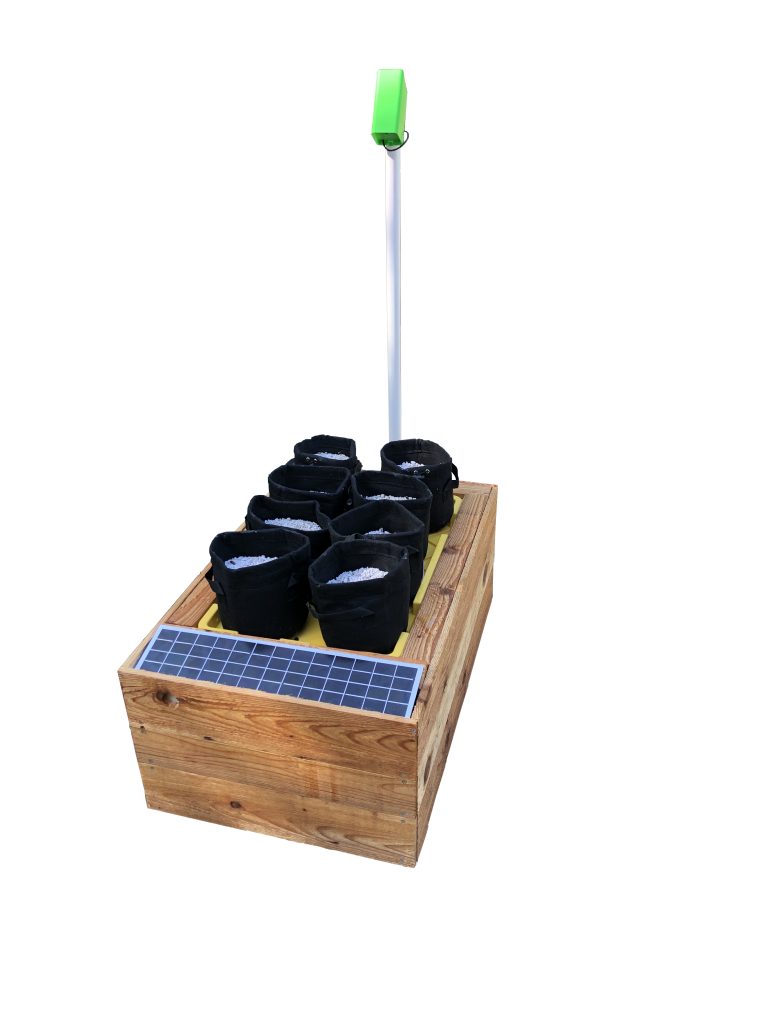
You will see that the GrowBot is made up of a wooden frame with a big tank inside. (That’s the water tank.)
Everything you need to set up the GrowBot is packed inside of the water tank.
The next step is to take everything out of the water tank except for the water sensor and the water circulation pump.
-
- remove the solar panel
- remove 4 sun protection boards
- remove the 8 growbags
- remove the bag of nutrients
- remove the smart camera
- remove bags of seeds
- remove camera pole
- two mounting clips + four screws
While unpacking take a moment to adjust your float valve to 45 degrees.
7. Configure the GrowBots Wifi
Configure the wifi before you assemble your GrowBot.
Here is a text version of how to configure the GrowBots wifi access.
8. Orienting the GrowBot
Now that the GrowBot is in the location you’ve selected (with 6 hours of sunlight, access to the water hose and WiFi), we have to make sure it is oriented in the right direction.
It is very important that the GrowBot be oriented so that the solar panel faces the south if you’re in the Northern hemisphere (or the North if you’re in the Southern hemisphere.)
Use a compass.
The reason this is so important is that we don’t want the camera’s shadow on the solar panel.
9. Connecting the Water Hose
Connect your water hose to the fitting inside the GrowBot.
The water hose should enter the GrowBot from the bottom up through the side between the wood frame and water tank and gently loops down. You can see this in the video below.
You will notice that the plastic tie wrap is left loose. It is intentionally designed this way so you can connect the water hose to the fitting without pinching the hose or putting pressure on the fitting, which will break it or cause it to leak.
An important consideration about the valve!
Got back pressure?
For your valve to function properly or well at least not to loose a little water when adding water it needs to have some back pressure.
Make sure the valve is oriented down and there is a bend in the tube that goes from the valve into the tank.
- We recommend plastic splitters and a food grade water hose.
- A common setup for one GrowBot is one splitter and one extra water hose.
- For several GrowBots we recommend one main hose from the faucet to your GrowBot garden and then as many hoses and splitters as you require.
- Have a look at how we designed and built our Growbot garden if you are considering it.
- Most of our clients buy at least one GrowBot per person in their home.
- Vegans should consider getting at least two per person in their household.
10. Assembly
- Attach the smart camera pole with the two brackets and for screws. Make sure the pole goes straight up.
- Put the USB wire down the top of the camera pole, seat the camera, run the wire through the camera wire hole to the control box and connect it.
- Double check the tubes are correctly inserted.
- Place the lid on the tank so the hole for the circulation pump is on the solar panel side and put the circulation pump tube through the lid hole.
- Place the GrowBags on the lid.
11. Nutrients
Get a watering can, a half gallon of water and add a quarter cup of nutrient to the water. Stir the water and nutrient till all or most of the nutrient is dissolved. Poor the water and nutrient into the nutrient jar.
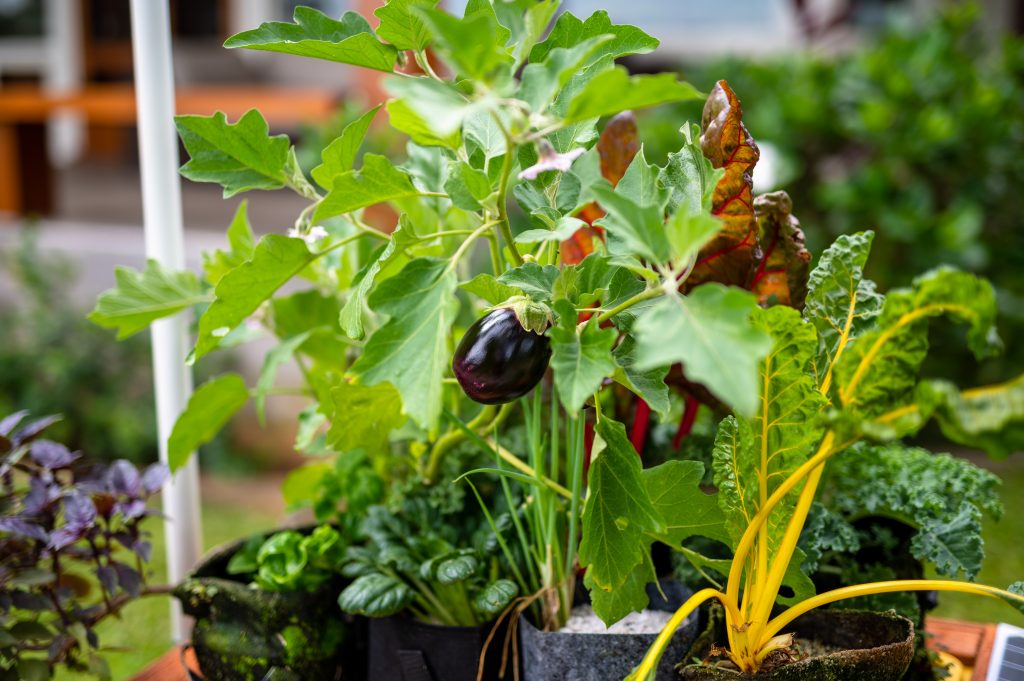
12. Planting
Continue to the planting page!
Warnings
- never drag your growbot .. it’s very likely to break
- Always get a friend to help you move a growbot and make sure you lift properly. Don’t try to move a GrowBot if the your doctor said don’t lift heavy things. Make sure you get a feel for the weight before committing to lift all the way up. If it feels to heavy remove the bags tank off the tank lid and empty the tank using a bucket.
- don’t place heavy things on your GrowBot
- don’t climb on the GrowBot
- don’t spray your growbot with a water hose — it was designed to with stand rain and sun but not a water hose